Introduction
Apple crumble cheesecake embodies the perfect harmony between rich, creamy texture and sweet, tart flavors. Combining a traditional cheesecake base with the warmth and comforting spices of an apple crumble transforms this dessert into something truly special.
When apples begin to fall from the trees and the air turns crisp, there's nothing quite like baking a dessert that shouts, 'autumn!' This cheesecake layers a decadent mix of apples, cinnamon, and buttery crumble on top, creating a delightful twist on classic favorites.
Ingredients
- 1 ½ cups graham cracker crumbs
The base for your cheesecake, these crumbs provide a crunchy texture that complements the creamy filling. They also help bind the crust together, ensuring a sturdy foundation for your cheesecake. - ½ cup unsalted butter, melted
Butter adds richness and flavor to the crust and helps to hold the graham cracker crumbs together. The melted state allows it to mix evenly, ensuring uniformity in texture. - 2 cups cream cheese, softened
Cream cheese is the star of the cheesecake filling, providing a rich and creamy texture. Its tanginess balances the sweetness of the other ingredients, creating a harmonious flavor profile. - ¾ cup granulated sugar
Sugar sweetens the cream cheese mixture and enhances the overall flavor of the cheesecake. It also helps with the creamy texture, leading to a smooth finish when baked. - 3 large eggs
Eggs provide structure and stability to the cheesecake. They help the filling set while also contributing to a rich mouthfeel, ensuring every slice holds its shape. - 1 teaspoon vanilla extract
Vanilla extract adds depth of flavor to the cheesecake. It enhances the sweetness and richness while ensuring each layer tastes delightful. - 3 cups apples, peeled and chopped (such as Granny Smith)
Apples contribute both flavor and texture to the cheesecake. Using tart varieties like Granny Smith ensures that the fruit balances the sweetness of the filling, adding a delightful burst of freshness. - 2 teaspoons cinnamon
Cinnamon brings warmth and a beloved autumnal spice to the apples. It enhances the overall flavor of the dessert, evoking feelings of comfort and nostalgia. - ¼ cup brown sugar
Brown sugar enhances the caramel notes in the apples and adds a deeper sweetness compared to granulated sugar. This leads to a richer flavor profile for the crumble topping. - ½ cup rolled oats
Oats add a hearty texture and chewiness to the crumble topping. They help absorb the juices from the apples while creating a satisfying contrast to the creamy cheesecake. - ½ cup all-purpose flour
Flour aids in binding the crumble topping together, creating a more structured texture when baked. It helps ensure the crumble holds its shape while providing a satisfying crunch. - ½ teaspoon salt
Salt balances the sweetness throughout the dessert. A pinch in both the cheesecake filling and the crumble ensures that all flavors pop and enhances overall taste.
Directions & Preparation
Step 1: Preheat the oven to 325°F (160°C).
Preheating the oven is crucial as it ensures that the cheesecake cooks evenly from the moment it goes in. An adequately heated oven allows the cheesecake to rise properly and set without cracking.
Step 2: Prepare the crust by mixing graham cracker crumbs, melted butter, and salt.
Combine the graham cracker crumbs, melted butter, and a pinch of salt until well-mixed. The butter should coat the crumbs thoroughly, allowing them to adhere once baked. Press this mixture firmly into the bottom of a springform pan, creating a solid base for the cheesecake.
Step 3: Bake the crust for 10 minutes, then let cool.
Baking the crust helps to set it in place and develops its flavor. Allowing it to cool before adding the filling prevents the cheesecake from heating up too quickly and helps keep the layers distinct.
Step 4: In a large mixing bowl, beat the softened cream cheese until smooth.
Ensuring your cream cheese is softened before use is essential for a lump-free filling. Beating it until smooth creates a velvety texture and ensures that it incorporates well with the sugar and eggs.
Step 5: Add granulated sugar, vanilla extract, and eggs, beating until fully combined.
Once the cream cheese is smooth, it’s time to add sugar and vanilla. Beating in the eggs one at a time helps achieve a cohesive mixture, minimizing the risk of overmixing, which can lead to a tough cheesecake.
Step 6: Pour the cheesecake filling over the cooled crust.
Gently pour the filling onto the cooled crust, using a spatula to spread it evenly. This layer will form the creamy component of your cheesecake and should sit smoothly atop the base.
Step 7: Bake the cheesecake for about 50-60 minutes or until set.
Baking is where the magic happens; the cheesecake will puff slightly and may crack on the surface. It's essential to check for doneness by gently shaking the pan; it should have a slight jiggle but not be liquid. Avoid overbaking to keep the creamy texture.
Step 8: Allow the cheesecake to cool before adding the apple topping.
Cooling the cheesecake allows it to firm up and makes it easier to slice later. This step also prevents the apple topping from cooking the cheesecake further, keeping its luscious texture.
Step 9: Prepare the apple filling by combining chopped apples, brown sugar, cinnamon, and salt.
Tossing the apples with brown sugar and spices will help develop their flavor and soften them slightly while baking. This mixture absorbs the sweetness and warmth of cinnamon, providing a delicious contrast to the creamy filling.
Step 10: Spread the apple mixture over the cheesecake.
Layering the apple filling over the cheesecake creates a balance between the creamy base and the fruity topping. Ensure it’s spread evenly, allowing each slice to have a balance of flavors.
Step 11: Prepare the crumble topping by mixing oats, flour, and remaining brown sugar.
Combining oats, flour, and sugar creates a crumbly mixture that will bake to a delicious, crunchy topping. Mixing dry ingredients ensures even distribution of flavors and textures, leading to a consistent crumble.
Step 12: Crumble this mixture over the apple layer.
Evenly distributing the crumble on top of the apples ensures that every bite is filled with that delightful crunch. Press it down slightly for it to stick during baking, but avoid packing it too tightly.
Step 13: Bake for an additional 30 minutes until the topping is golden and the apples are tender.
This final bake allows the crumble to crisp while the apples soften and meld into the cheesecake. Keep an eye on the topping; it should turn a lovely golden brown, but be careful not to let it burn.
Step 14: Let the cheesecake cool completely before refrigerating.
Cooling allows the cheesecake to set up properly; putting it directly into the fridge can lead to a soggy crust. This resting period also develops flavors further, adding to your dessert’s overall richness and complexity.
Step 15: Chill the cheesecake for at least four hours or overnight before serving.
Chilling the cheesecake is critical as it solidifies the texture and allows the flavors to intensify. A well-chilled cheesecake offers a delightful slice that holds together, showcasing your hard work beautifully.
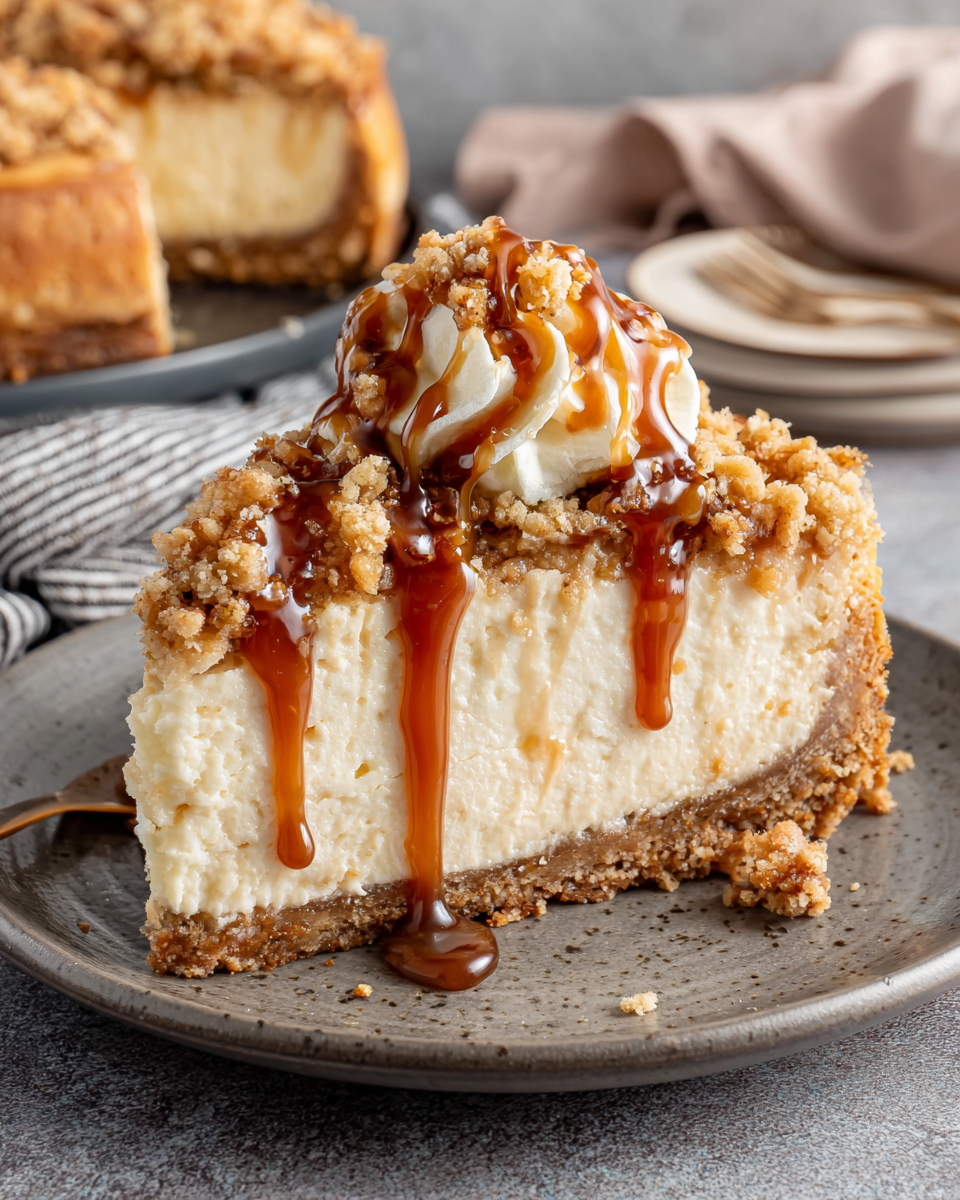
Step 16: Slice and serve with whipped cream or a drizzle of caramel if desired.
Serving this cheesecake with whipped cream or caramel enhances its indulgence, allowing guests to experience a delightful blend of textures and flavors. Each slice promises rich creaminess, sweet apples, and crunch in every bite.

The Importance of Cream Cheese Quality
The success of your apple crumble cheesecake hinges significantly on the quality of your cream cheese. Opt for full-fat brands, as they produce a richer and creamier filling, resulting in a smooth and satisfying texture that stands out. Skim or low-fat options may compromise flavor and consistency, leading to a less enjoyable experience.
Selecting the Right Apples
When choosing apples for the topping, selection is key for a balanced flavor. Tart apples like Granny Smith or Honeycrisp add a delightful zing that contrasts beautifully with the sweetness of the cheesecake. Ensure they are firm to hold their shape during baking, creating a pleasant bite and preventing a mushy filling.
Enhancing Crunch with a Perfect Crumble
A well-executed crumble topping takes your cheesecake to the next level, offering satisfying crunch and flavor. It's essential to follow the proportions accurately—too much butter can lead to a greasy topping, while too little may result in a dry texture. Aim for a crumbly yet cohesive mixture that balances perfectly over the soft apple layer.
FAQs
What if my cheesecake cracks while baking?
Cracking often happens due to rapid temperature changes or overbaking. To prevent this, ensure your oven is properly preheated and consider baking with a water bath for more gentle heat distribution.
Can I substitute other fruits for the apple topping?
Yes, other fruits like pears or peaches can be used. Just ensure they provide a similar sweetness and texture, adjusting sugar and spices accordingly to match their flavor profile.
What should I do if the crumble topping is too dry?
If your crumble is too dry, consider adding a tablespoon of melted butter or a splash of water to help bind the mixture. This will create a better texture that holds together while still remaining crunchy.
How can I tell when the cheesecake is done baking?
A perfectly baked cheesecake should have a slight jiggle in the center when you gently shake it. It should not look wet or liquid; if it does, continue baking for a few more minutes.
What if my apples release too much juice during baking?
If you notice excess juice, you can drain some of it off before serving, or increase the amount of flour in the crumble to absorb moisture and prevent a soggy topping.
Can I use packaged crumb crusts instead of making my own?
Absolutely! Pre-made crusts save time and can be convenient. Just ensure they’re the right size for your pan and adjust the amount of butter used in the recipe.
Conclusion
With its incredible blend of creamy cheesecake, sweet spiced apples, and crunchy crumble, this apple crumble cheesecake is sure to impress at any gathering or as a comforting family dessert. It's a delicious way to celebrate the flavors of fall and bring cozy warmth to your table.
Embrace the joy of baking as you create this delightful treat. Whether enjoyed alone or shared with loved ones, each bite will remind you that there’s magic in homemade desserts, especially when they highlight the bounties of the season.
Recipe Card
Notes
Additional serving suggestions: pair with a crisp salad, garlic bread, or roasted seasonal vegetables for balance.
For make-ahead, prep components separately and assemble just before heating to preserve texture.
Taste and adjust with acid (lemon/vinegar) and salt right at the end to wake up flavors.